Arizona German Guide bridges German culture with Arizona’s stunning landscapes‚ offering insights into traditional festivals‚ music‚ and cuisine while providing practical travel tips for German visitors.
Overview of Arizona’s Unique Culture and German Influences
Arizona’s culture is a vibrant blend of Native American heritage‚ Hispanic traditions‚ and European influences‚ with German settlers contributing significantly to its history. German immigrants brought farming techniques‚ architectural styles‚ and cultural practices that enriched the state’s diversity. Today‚ this heritage is celebrated through festivals‚ music‚ and cuisine‚ creating a unique cultural tapestry. Arizona’s arid landscapes and iconic landmarks like the Grand Canyon also inspire a deep connection to nature‚ making it a fascinating destination for German travelers seeking both cultural and natural experiences.
The Purpose of the Arizona German Guide
The Arizona German Guide serves as a comprehensive resource for German-speaking travelers‚ bridging cultural connections and offering practical insights. It highlights Arizona’s unique landscapes‚ historical ties to German settlers‚ and vibrant cultural events. The guide provides tailored travel tips‚ from transportation and accommodations to dining and outdoor adventures‚ ensuring German visitors can fully immerse themselves in Arizona’s diverse heritage. Its purpose is to enhance the travel experience by combining local expertise with German perspectives‚ making it an indispensable tool for exploring this captivating state.

Cultural Highlights
Arizona’s cultural scene blends German heritage with Southwestern charm‚ featuring vibrant festivals‚ traditional music‚ and art‚ while highlighting historical ties and unique local traditions.
Traditional German Festivals in Arizona
Arizona hosts vibrant German festivals‚ blending heritage with local charm. Oktoberfest celebrations feature traditional beer gardens‚ live music‚ and authentic cuisine. Christmas markets offer handmade crafts and festive treats. These events showcase German culture through folk dances‚ artisanal goods‚ and community spirit‚ attracting both locals and travelers. Guided tours highlight the state’s unique twist on German traditions‚ making Arizona a fascinating destination for cultural exploration.
German Music and Art in Arizona
Arizona’s cultural scene is enriched by German music and art‚ blending traditional and contemporary influences. Local events feature German folk music‚ polka bands‚ and classical performances; Art galleries showcase works by German artists‚ highlighting themes of landscapes and heritage. Cultural exchanges and exhibitions celebrate the rich artistic traditions of Germany‚ while local artisans create pieces inspired by Arizona’s natural beauty. These creative expressions foster a unique cultural connection‚ offering visitors a glimpse into Germany’s artistic legacy intertwined with the American Southwest.
Historical German Settlements in Arizona
German settlers arrived in Arizona during the late 19th century‚ drawn by fertile lands and economic opportunities. They established thriving farming communities‚ particularly in the Tempe and Phoenix areas‚ bringing their architectural styles and cultural traditions. Many historic buildings reflect German influence‚ blending European designs with Southwestern elements. These settlers played a significant role in shaping Arizona’s early agriculture and trade‚ leaving a lasting legacy visible in the state’s heritage sites and historical records. Their contributions remain a testament to Arizona’s diverse settlers’ history.

Travel Tips for German Visitors
Plan ahead‚ pack essentials like sunscreen and water‚ and explore Arizona’s stunning landscapes. Utilize German-speaking guides for tailored tours and cultural insights‚ ensuring a seamless experience.
Research transportation options and book accommodations in advance to maximize your trip efficiency and enjoyment in Arizona’s diverse regions.
Planning Your Trip to Arizona
Start by researching Arizona’s diverse regions‚ from Monument Valley to the Sonoran Desert. Plan your itinerary based on seasonal events‚ such as Oktoberfest or Christmas markets. Book accommodations in cities like Phoenix or Sedona for easy access to key attractions. Rent a car or opt for guided tours with German-speaking guides for convenience. Pack essentials like sunscreen‚ water‚ and a hat to combat the arid climate. Consider downloading travel brochures or guides for detailed insights. Customize your trip with specialized tour companies offering tailored experiences.
Plan ahead to ensure a smooth and memorable journey through Arizona’s stunning landscapes.
Transportation Options for German Travelers
German travelers can easily navigate Arizona with various transportation options. Renting a car is ideal for exploring vast landscapes‚ with companies like Enterprise and Hertz offering services. Public transportation is limited but available in major cities like Phoenix. Guided tours with German-speaking guides provide hassle-free exploration of attractions such as Sedona and the Grand Canyon. Additionally‚ domestic flights connect key destinations‚ making it efficient to travel longer distances.
Plan ahead to choose the best option for your Arizona adventure.
Accommodation Recommendations
Arizona offers diverse accommodations catering to German travelers‚ from luxury hotels to cozy boutique stays. Phoenix and Sedona feature high-rated options‚ with some staff fluent in German. Budget-friendly choices like guesthouses and vacation rentals are also available. For a unique experience‚ consider eco-lodges near natural wonders. Book in advance‚ especially during peak seasons. Many hotels provide amenities like pools and Wi-Fi‚ ensuring comfort in Arizonas arid climate. Choose accommodations that suit your travel style for an enjoyable stay in this breathtaking state.
Plan your lodging to match your adventure.
Packing Essentials for Arizona’s Climate
Arizona’s arid climate demands careful packing. Essentials include high SPF sunscreen‚ wide-brimmed hats‚ polarized sunglasses‚ and lightweight‚ breathable clothing. Stay hydrated with reusable water bottles‚ and wear moisture-wicking fabrics. Comfortable hiking shoes are a must for outdoor adventures. Include layers for cooler evenings‚ especially in desert areas. A small first-aid kit with sunburn relief is wise. Don’t forget a portable charger for cameras and maps. Pack accordingly to enjoy Arizona’s stunning landscapes comfortably.
Prepare for extreme heat and varied temperatures.

Must-Visit Destinations
Explore Arizona’s iconic landmarks‚ from the breathtaking Grand Canyon to the vibrant red rocks of Sedona‚ and immerse yourself in the stunning natural beauty that defines this state.
The Grand Canyon: A German Perspective
The Grand Canyon‚ one of Arizona’s most iconic natural wonders‚ captivates German visitors with its vast‚ awe-inspiring landscapes. Many German travelers explore this UNESCO World Heritage Site through guided tours led by German-speaking guides‚ offering unique insights into its geological history and cultural significance. The canyon’s sheer scale and breathtaking views make it a must-visit destination for any German traveler seeking to experience Arizona’s natural beauty and connect with its rich heritage.
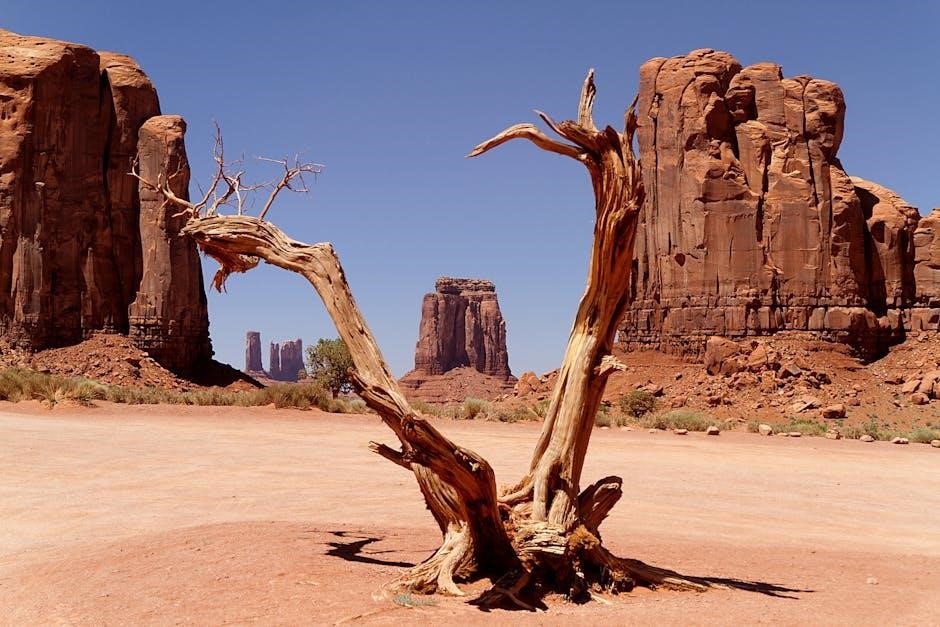
Exploring Monument Valley
Monument Valley‚ a iconic symbol of the American West‚ captivates German visitors with its striking red rock formations and rich Navajo history. German-speaking guides lead specialized tours‚ offering insights into the valley’s cultural and geological significance. Visitors can explore famous landmarks like the Mittens and Totem Pole‚ while learning about the region’s history through engaging storytelling. The breathtaking sunsets and unique landscapes make Monument Valley a must-visit destination for German travelers seeking an unforgettable Arizona experience.
Sedona’s Red Rocks and German Tours
Sedona’s breathtaking red rock formations captivate German visitors‚ offering a unique blend of natural beauty and cultural experiences. Guided tours led by German-speaking experts provide insights into the area’s history and geology. Jeep adventures through Cathedral Rock and Boynton Canyon are popular‚ while hiking trails like Bell Rock offer stunning views. The nearby Oak Creek Canyon adds a tranquil dimension to the landscape. Sedona’s vibrant arts scene and charming shops further enchant German travelers‚ making it a must-visit destination in Arizona.
The Sonoran Desert: Unique Landscapes
The Sonoran Desert‚ a true natural wonder‚ captivates German visitors with its iconic saguaro cacti and vast‚ sun-drenched landscapes. Guided tours led by German-speaking experts explore the desert’s unique flora and fauna‚ offering insights into its ecological significance. The Saguaro National Park and Arizona-Sonora Desert Museum are must-visit destinations‚ showcasing the region’s biodiversity. German travelers can immerse themselves in the desert’s serene beauty‚ discovering hidden oases and vibrant wildlife‚ making the Sonoran Desert an unforgettable experience in Arizona.
German-Inspired Cuisine in Arizona
Arizona’s German-inspired cuisine offers a blend of traditional flavors and local twists‚ featuring authentic restaurants‚ beer gardens‚ and bakeries that cater to German tastes and preferences.
Traditional German Restaurants
Arizona is home to authentic German restaurants that bring a taste of Bavaria to the desert. From hearty dishes like schnitzel and sauerbraten to classic sides such as spätzle and sauerkraut‚ these eateries offer a true German culinary experience. Many restaurants feature imported German beers and wines‚ creating a festive atmosphere reminiscent of Oktoberfest. Popular spots in Phoenix and Flagstaff serve up traditional favorites‚ making them must-visit destinations for German food enthusiasts. Whether you’re craving bratwurst or Black Forest cake‚ Arizona’s German restaurants deliver delicious‚ authentic flavors.
Beer Gardens and Breweries
Arizona’s beer gardens and breweries offer a vibrant blend of German-inspired craft beers and festive atmospheres. Popular spots like Haus Murphy’s in Glendale and local breweries in Phoenix feature authentic German-style lagers and wheat beers. Many establishments collaborate with German breweries to create unique flavors. Outdoor beer gardens provide a relaxing setting with live music and traditional German snacks. These destinations are perfect for enjoying a cold brew while soaking in the desert ambiance‚ making them a must-visit for German beer enthusiasts exploring Arizona.
German Bakeries and Cafés
Arizona’s German bakeries and cafés offer a taste of tradition with authentic pastries‚ bread‚ and desserts. From classic Schwarzwälder Kirschtorte to freshly baked Brötchen‚ these spots cater to German cravings. Local favorites like “Bavarian Bakery” in Phoenix and “Black Forest Café” in Flagstaff provide cozy settings with Alpine-inspired decor. Many cafes serve traditional German coffee and tea‚ paired with homemade cakes and strudels. These charming destinations are perfect for indulging in familiar flavors while enjoying a warm‚ welcoming atmosphere.

Outdoor Adventures
Arizona offers thrilling outdoor adventures‚ including Jeep tours led by German-speaking guides‚ UTV explorations in the Sonoran Desert‚ and hiking trails favored by German visitors.
Jeep Tours with German-Speaking Guides
Explore Arizona’s breathtaking landscapes with Jeep tours led by German-speaking guides‚ offering a unique cultural connection. These tours traverse iconic spots like Sedona’s red rocks and the Sonoran Desert‚ providing stunning views and insights into the region’s history. German visitors can enjoy seamless communication‚ making the experience more engaging and memorable. The guides often include stops for photography and storytelling‚ enhancing the adventure. This is a perfect way to immerse yourself in Arizona’s natural beauty while feeling at home with German-language support.
UTV Adventures in the Sonoran Desert
Experience the thrill of UTV adventures in Arizona’s stunning Sonoran Desert‚ a must-do for German travelers seeking adrenaline and natural beauty; Expert guides lead thrilling off-road excursions‚ offering breathtaking views of cacti-dotted landscapes and rugged terrain. These tours are perfect for exploring remote areas inaccessible by car‚ with guides sharing insights into the region’s ecosystems and history. German-speaking guides ensure a seamless experience‚ while the open terrain provides endless opportunities for adventure and photography. Don’t forget to pack sunscreen‚ water‚ and a hat for a memorable journey through this unique desert landscape.
Hiking Trails Popular Among German Visitors
Arizona’s diverse hiking trails captivate German visitors with breathtaking views and unique landscapes. Sedona’s red rock formations‚ the Grand Canyon’s iconic paths‚ and the Sonoran Desert’s cactus trails are favorites. Many trails offer varying difficulty levels‚ from easy strolls to challenging climbs. German-speaking guides provide insights into the region’s history and ecosystems‚ enhancing the hiking experience. These trails are perfect for nature enthusiasts seeking adventure and unforgettable scenery. Prepare with sturdy shoes‚ water‚ and sun protection for a memorable exploration of Arizona’s natural beauty.
Historical Connections
Arizona’s German settlers left a lasting legacy in architecture‚ traditions‚ and historical sites‚ creating a unique cultural bridge between Germany and the American Southwest.
German Influence on Arizona’s Architecture
German settlers brought distinctive architectural styles to Arizona‚ blending Bavarian and Alpine designs with Southwestern elements. Brick and stone constructions‚ common in German villages‚ are evident in historic buildings across the state. The use of red brick and timber accents reflects a European heritage‚ while adaptations like adobe walls showcase regional influences. These architectural fusion sites attract visitors‚ offering a unique glimpse into Arizona’s cultural diversity and its German roots. Locations like Sedona and Phoenix feature such structures‚ preserving history while inspiring modern designs.
Historical Sites Linked to German Settlers
Arizona’s rich history includes contributions from German settlers‚ evident in preserved sites like the mining towns of Bisbee and Globe. These areas reflect German architectural influences and cultural traditions. The town of Prescott features historical buildings with German design elements‚ while rural communities showcase German farming practices. Visit the Pioneer Museum in Flagstaff to explore exhibits on German immigration and its impact on Arizona’s development. These sites offer a glimpse into the state’s diverse heritage‚ blending German roots with Southwestern history.
Such locations attract travelers interested in cultural exploration and historical insights.

Shopping and Souvenirs
Discover unique German-inspired treasures and local crafts in Arizona‚ blending Southwestern charm with German heritage. Explore artisanal shops offering handmade goods‚ appealing to those seeking authentic cultural treasures.
German-Themed Shops in Arizona
Arizona’s German-themed shops offer a unique blend of traditional and modern items‚ reflecting the state’s cultural diversity. From authentic lederhosen to imported beer steins‚ these shops cater to both locals and tourists. Visit the “German Deli” in Phoenix for traditional food and gifts‚ or explore “Haus of German Goods” in Sedona for handmade crafts. Many shops also feature local artisans blending German and Southwestern styles‚ creating one-of-a-kind souvenirs. Whether you’re seeking festive decorations or authentic attire‚ these stores provide a taste of Germany in the heart of Arizona.
Local Crafts and Artisans
Arizona’s local crafts and artisans showcase a blend of German heritage and Southwestern culture. From handcrafted pottery to intricate woodcarvings‚ these creations reflect the state’s diverse influences. Many artisans in Sedona and Flagstaff incorporate traditional German techniques into their work‚ producing unique pieces like leather goods and woven textiles. Festivals and markets often highlight these crafts‚ offering a glimpse into the region’s creative spirit. Visitors can explore these handmade treasures‚ supporting local talent while experiencing the fusion of German and Arizona traditions.
Entertainment and Nightlife
Arizona’s vibrant nightlife features German-inspired music events‚ Oktoberfest celebrations‚ and theater performances‚ blending cultural traditions with modern entertainment for a unique and unforgettable experience.
German Music and Dance Events
Arizona’s German music and dance events bring a touch of Bavaria to the desert‚ featuring traditional folk dances‚ live bands‚ and lively Oktoberfest celebrations. From polka nights in Sedona to Phoenix’s German-themed concerts‚ these events showcase rich cultural heritage. Local communities and German expats gather to enjoy authentic music‚ dance‚ and festive atmosphere‚ making it a unique experience for visitors. These events are perfect for immersing oneself in German traditions while exploring Arizona’s vibrant cultural scene.
German-Language Theaters and Performances
Arizona’s German-language theaters and performances offer a unique cultural experience‚ blending traditional German plays with local storytelling. From Phoenix to Sedona‚ intimate venues host German-speaking actors and musicians‚ showcasing a mix of classic and modern works. These performances often highlight Arizona’s landscapes and history through a German lens‚ creating a captivating blend of cultures. German expats and enthusiasts gather to enjoy these events‚ fostering a sense of community and cultural exchange in the heart of the American Southwest.
Guided Tours
Explore Arizona with expert-led guided tours designed for German visitors‚ blending cultural insights with breathtaking landscapes. From Jeep adventures to customizable itineraries‚ discover the state’s unique charm.
Specialized Tour Companies for German Visitors
Several tour companies in Arizona cater specifically to German travelers‚ offering expert-led excursions tailored to their interests. These companies provide German-speaking guides‚ ensuring seamless communication and cultural insights. From Jeep tours through Sedona’s red rocks to UTV adventures across the Sonoran Desert‚ these specialized tours blend Arizona’s natural beauty with German cultural connections. Many companies also offer customizable itineraries‚ allowing visitors to explore iconic sites like the Grand Canyon and Monument Valley in a personalized way. This tailored approach enhances the travel experience for German visitors‚ making their Arizona journey unforgettable and hassle-free.
Customizable Tours for German Travelers
Arizona offers customizable tours tailored to German travelers’ preferences‚ allowing for personalized exploration of its iconic landscapes. From Sedona’s red rocks to Monument Valley‚ these tours provide flexibility to choose destinations and activities. Many companies allow travelers to design their itineraries‚ focusing on cultural‚ historical‚ or outdoor experiences. With expert guides fluent in German‚ visitors can immerse themselves in Arizona’s beauty while enjoying seamless communication. This approach ensures a unique and memorable journey‚ catering to individual interests and preferences for German-speaking explorers.
Seasonal Events
Arizona hosts vibrant seasonal events‚ including Oktoberfest celebrations and German Christmas markets‚ offering cultural experiences that resonate with German travelers throughout the year.
German Christmas Markets in Arizona
Arizona’s German Christmas markets offer a festive atmosphere‚ blending traditional German holiday customs with Southwestern charm. Visitors can enjoy authentic German food‚ handcrafted ornaments‚ and live music. These markets‚ often held in cities like Phoenix and Flagstaff‚ feature unique local twists while maintaining traditional elements. Shoppers can find handmade goods‚ and families can participate in holiday activities. The markets provide a cultural bridge‚ allowing German visitors to celebrate familiar traditions in a new setting‚ while introducing Arizonans to German holiday customs. This seasonal event is a must-experience for anyone seeking a blend of heritage and local flair.
Oktoberfest Celebrations
Arizona’s Oktoberfest celebrations bring a taste of Bavaria to the Southwest‚ featuring authentic German food‚ live music‚ and festive ambiance. Popular events in cities like Phoenix and Tempe showcase traditional bratwurst‚ schnitzel‚ and German beers. Attendees enjoy polka dancing‚ stein-holding contests‚ and cultural activities. These gatherings attract both German expats and locals‚ offering a vibrant blend of heritage and Arizona charm. Many events include family-friendly activities‚ making them a great way to experience German traditions in a unique Southwestern setting. Prost! Arizona’s Oktoberfest is a must-attend for beer enthusiasts and culture lovers alike.

Community and Forums
Arizona’s German expat communities and online forums connect visitors with locals‚ offering cultural exchange‚ language support‚ and event recommendations‚ fostering a strong sense of belonging for German travelers.
German expat communities in Arizona
Arizona hosts vibrant German expat communities‚ particularly in Phoenix‚ Flagstaff‚ and Tucson. These groups organize cultural events‚ language meetups‚ and traditions‚ fostering connections among expats. Online forums and social media platforms serve as hubs for sharing experiences‚ tips‚ and recommendations. Many communities celebrate German holidays like Oktoberfest and Christmas markets‚ creating a sense of home. Local organizations‚ such as the Arizona German Association‚ offer resources for integration and cultural preservation. These networks provide invaluable support for German visitors and residents alike‚ ensuring a welcoming environment in the Grand Canyon State.
- Active expat groups in major cities.
- Cultural events and traditional celebrations.
- Online platforms for connection and advice.
Online Forums for German Travelers
Online forums provide a vital resource for German travelers planning trips to Arizona. Platforms like TripAdvisor and Lonely Planet offer detailed travel guides‚ while Facebook groups and Reddit forums share firsthand experiences. German-language forums discuss Arizona’s highlights‚ from Sedona’s red rocks to the Grand Canyon. These communities offer practical advice on transportation‚ accommodations‚ and dining. Additionally‚ they highlight German-friendly services and events‚ such as Oktoberfest celebrations. Engaging with these forums helps travelers connect with expats and locals‚ ensuring a well-prepared and enjoyable journey to Arizona.
- German-language travel tips and recommendations.
- Discussions on Arizona’s top attractions.
- Insights into German-friendly services and events.